Monday, April 30, 2012

Final Project WIP

Still a work in progress.  The main model needs to be retopped especially around the head and biceps.  This model was more for experimenting with dynamesh and learning anatomy than anything else.  The model was made using dynamesh which makes the new mesh with perfectly horizontal and vertical lines to make a model out of perfect boxes.  This means that any part of the model that is rotated (i.e. the arms) will appear jagged in certain areas.

Dynamesh is great for making concept sculpts that can easily turned into game-ready models with one retop pass.

For the low-poly object, i decided to go with equipment and gear for the ghoul.  The total tricount for all of the gear combined is around 4000 but that's only because the armband and feet wrappings were made by duplicating faces which were then extruded outwards.  A simple solution to the polycount problem is to go in and start removing redundant edges in the duplicated faces.

This was also an experiment on how to make the gear itself.  the Belt/loincloth was made by extruding faces off of a cylinder.  The claw gloves were made by extruding faces out of cubes.  And the feet wrappings/armband was made by extruding duplicated faces.  This was mostly to see what would kind of primitives would give better looking and easier to make results.

The model is supposed to be hunched over on all fours almost and the spikes were added because I thought it would make a pretty cool effect when animated.

Front

Back

Side
Closeup on face.

Unfortunately, because I didn't retop the head, the base model is noticeably lower-res when seen up close in Unity or Maya.  This is what the head is supposed to look like.


Friday, March 30, 2012

More Fun With Dynameshes


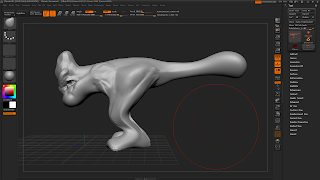
Another quick Dynamesh sculpt. This time it's a dinosaur-like monster inspired by the Barroth from Monster Hunter.

I started by quickly blocking out the shape of the head with the ClayTubes and ClayBuildup brush (not sure what exactly the difference is). The body was made by stretching out the mesh with the move tool, inflating the stretched portion of the mesh, subdividing it to add more resolution to the area, and then doing it all over again. Obviously this model isn't anywhere near optimal because of all the stretched and folded polys but aside from adding the details, textures, and stuff, the only thing this model would need is a quick retop to be game-ready.

I purposefully spent as little time as possible on this to see how fast you could make a base sculpt of a model for concept purposes and wound up at this point in about 30-40 minutes. As you can see, dynameshes are a great tool for quickly getting a base mesh.

Experimenting With Dynameshes


Here's a quick sculpt I made a couple of weeks ago when we were first introduced to ZBrush 4R2. The big new feature in 4R2 is dynameshes which is a great new way of sculpting and much more intuitive imo than painting zspheres and stuff because you can stretch the mesh as much as you want and it'll fix itself once you subdivide it. Great for making quick concept pieces.

I focused more on getting the shape of the head to look cool from the side. Kinda reminds me of the Protoss from Starcraft.

Epic Door


Here is a screenshot of a door made for a small level. There are a bunch of problems with the mesh itself as it is. Not enough resolution on the doorframe's lintel and because I accidentally imported the model as one solid mesh, I couldn't subdivide it without subdividing everything. The only real solution I've come up with is to separate it in maya and redo it which hopefully won't take too long.

The design on the lintel was made by taking a screenshot of the door and painting over where I wanted it to go in photoshop. After that I used the design as an alpha and used the lightbox to apply it to the lintel. This is what the design looks like in Photoshop:

The texture on the door was made by taking a wood alpha off the ZBrush site and lightboxing it on at 2 Z Intensity. Those are supposed to be spikes on the door in the middle but I made them using alphas and it turned out looking pretty horrible. When I inevitably redo the model I'll have to add the spikes as real geometry.

There are also several topology problems as well, specifically with the borders of all the geometry.

Alien Hulk Update


I wound up taking an old torso model I planned on finishing and added arms and legs. Took them off of the SuperAverageMan model by hiding the body in ZBrush, appending it to the torso and then Retopologizing the entire thing into one solid mesh. All there is left to finish is to paint the arms, lower torso, and fix up the polypainting on the head.

Wednesday, March 28, 2012

The Inaugural Sketchbook Post

This blog is going to have weekly updates of sketches, zsculpts, concept art, EVERYTHING!